How to Adjust Your Jacobsen Bedknife
view all newsBedknife-to-Reel (Pre-adjustment Check)
- Check the reel bearings for end play or radial play. There should be no end play or radial play. See chart below.
- Inspect the reel blades and bedknife to insure good sharp edges without bends or nicks.
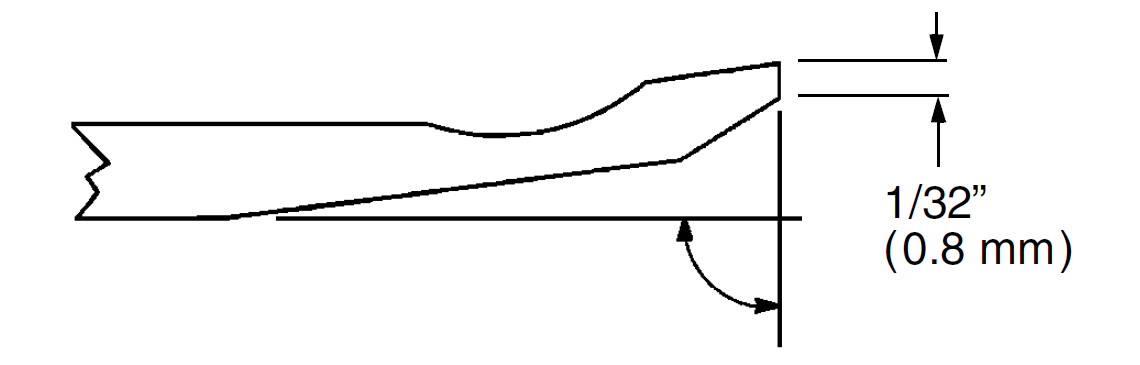
a. The leading edge of the reel blades must be sharp, free of burrs and show no signs of rounding off.
b. The bedknife and bedknife backing must be securely tightened. The bedknife must be straight and sharp.
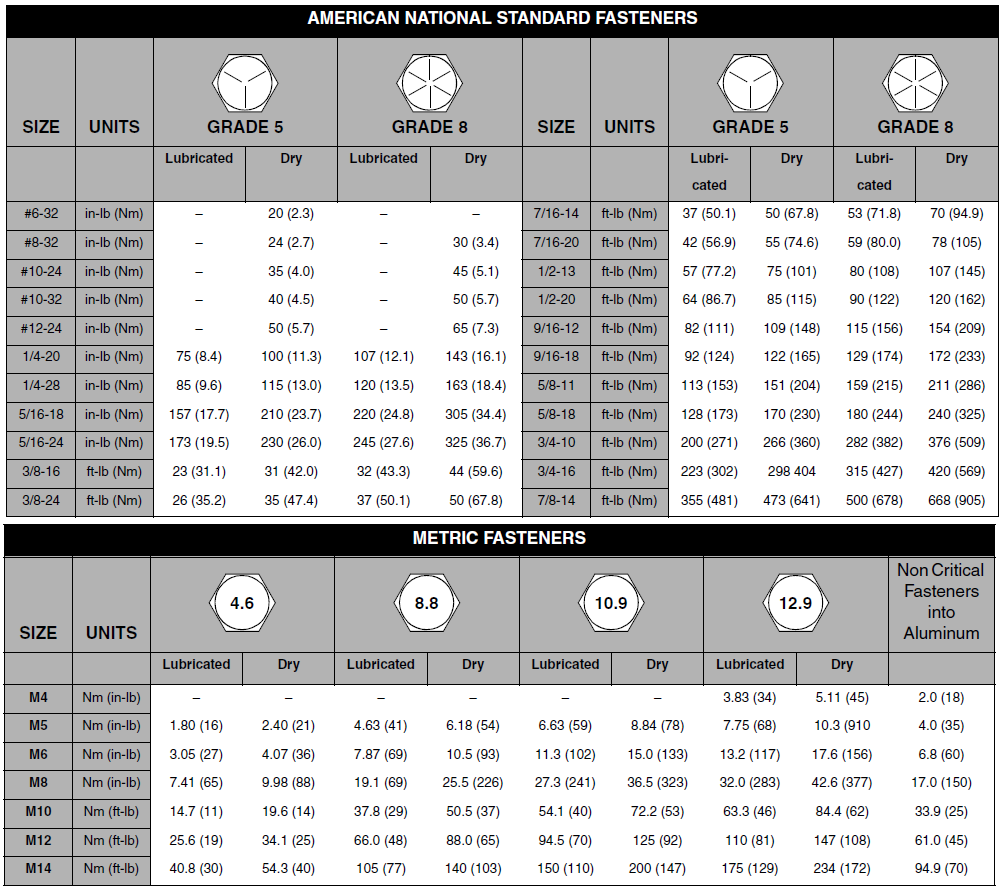
c. A flat surface of at least 1/32 in. (0.8 mm) minimum must be maintained on the front face of the bedknife. Use a standard flat file to dress the bedknife. - If wear or damage is beyond the point where the reel or bedknife can be corrected by the lapping process, they must be reground.
- Proper reel-to-bedknife adjustment is critical. A gap of 0.001 to 0.003” (0.025 to 0.076 mm) must be maintained across the entire length of the reel and bedknife.
- The reel must be parallel to the bedknife. An improperly adjusted reel will lose its sharp edges prematurely and may result in serious damage to the reel and bedknife.
- Grass conditions will also affect the adjustment.
a. Dry, sparse conditions will require a wider gap to prevent heat buildup and damage to the reel and bedknife.
b. High quality grass with a good moisture content requires a closer gap (near zero).
Bedknife Adjustment
Notice: Avoid excessive tightening or serious damage may result to bedknife and reel blades. Reels must turn freely.
- Start adjustment at the leading end of the reel, followed by the trailing end. The leading end of the reel blades is that end which passes over the bedknife first during normal reel rotation.
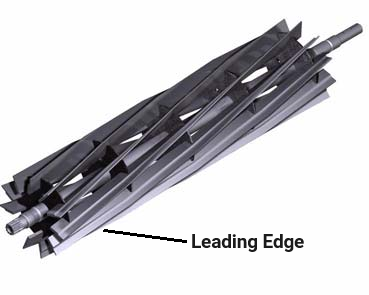
- Use adjusters (A and B), to adjust gap. Rotate adjusters (clockwise) to close gap. Each click of the adjuster moves the bedknife 0.001” (0.025 mm) closer to the reel.
a. Slide a feeler gauge or shim stock 0.001” - 0.003” (0.025 - 0.075 mm) between the reel blade and the bedknife. Do not turn the reel.
b. Adjust the trailing end of the reel to the same gap in a similar manner then recheck the adjustment at the leading end.
c. When the reel is properly adjusted to the bedknife, the reel will spin freely and you should be able to cut a piece of newspaper, along the full length of the reel, when the paper is held at 90° to the bedknife.
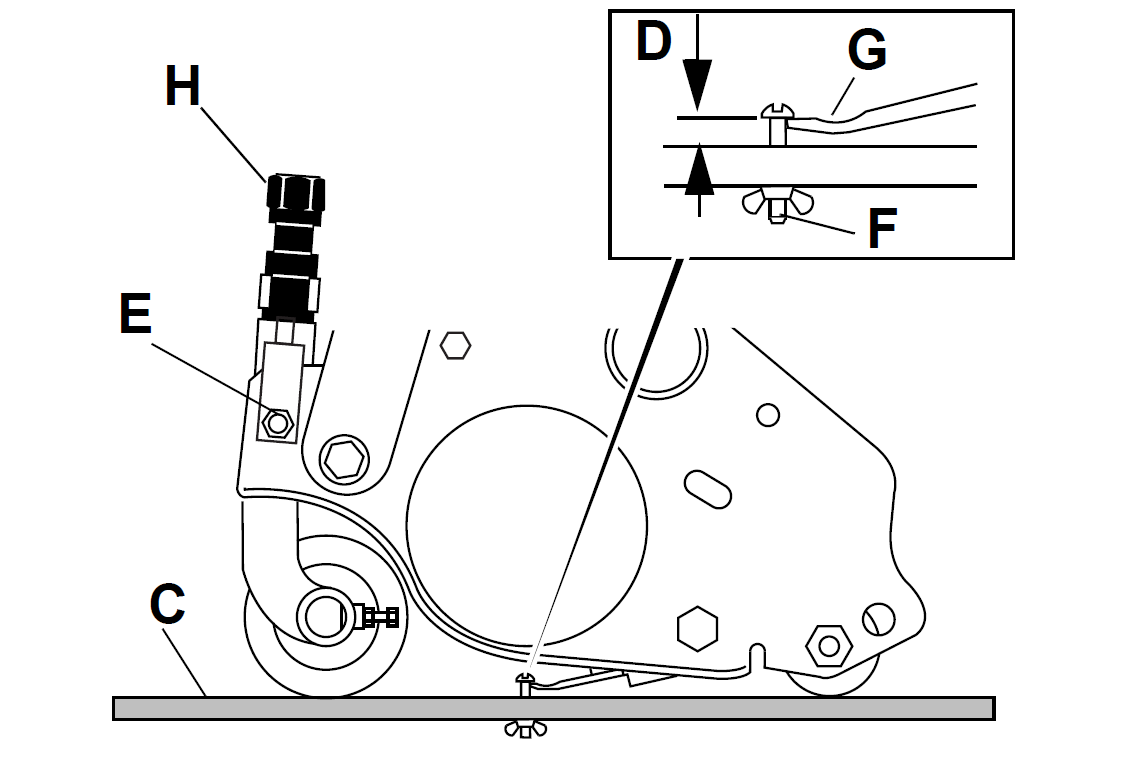
Cutting Height
Note: Always make the reel to bedknife adjustment before adjusting height of cut.
- Set desired cutting height on the gauge (C).
a. Measure distance between the underside of screw head and gauge block surface (D).
b. Adjust screw (F) to obtain desired height then tighten the wing nut. - Loosen the nuts on the front roller brackets (E) just enough to allow the adjuster knob (H) to raise or lower the front roller.
- Place gauge (C) across bottom of front and rear rollers near one end of roller.
- Slide the head of gauge screw (F) over the bedknife and adjust the knob (H) to close the gap between the screw head and bedknife. Then tighten locknut (E).
- Repeat Steps 4 and 5 on opposite end. Complete adjustment to one end before adjusting opposite end.
- Tighten nuts (E) and recheck each end.
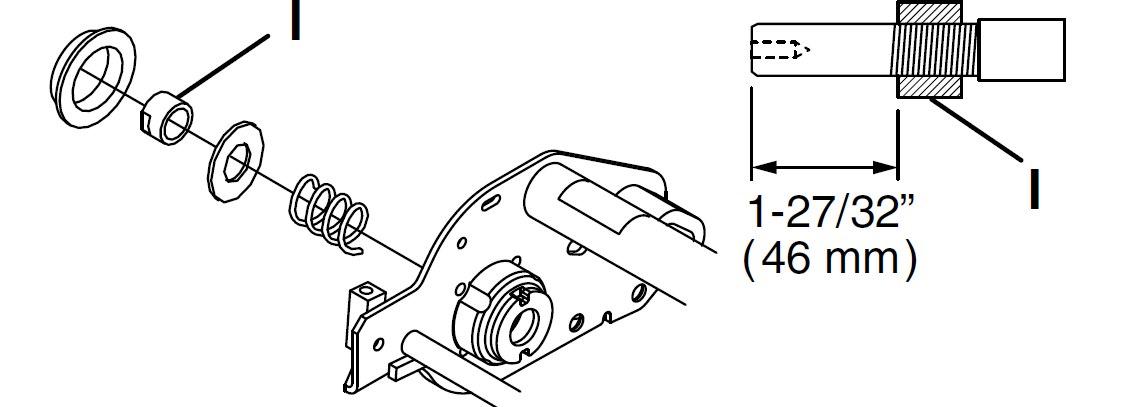
Reel Bearing
Any radial play or excessive end play indicates bad bearings, a weak tension spring or a backed off nut.
- Check bearing housing mounting hardware. Tighten or replace components as required. Carefully clean threads with degreaser.
- Apply a medium strength grade of Loctite to nut (I), then thread nut onto the reel shaft until the nut is 1-27/32” (46 mm) from the end of the reel shaft.
- Fill reel bearing housings with NLGI - Grade O grease after adjusting spring.
Bedknife Adjuster Spring
For proper operation, bedknife adjuster spring should be compressed to a dimension of 1-7/16 - 1-1/2 in. (36.5-38 mm).
To adjust spring compression, loosen or tighten nut (J) to obtain a distance of 1-7/16 - 1-1/2 in. (36.5-38 mm).
After adjusting spring, check reel to bedknife adjustment.

Bedknife Adjuster Tension
Notice: Overtightening slotted nut (K) will make bedknife adjuster rod (L) difficult to adjust.
Remove cotter pin (M) and fully loosen, then tighten slotted nut (K) to remove clearance (no end play) between components. Continue to tighten nut until next slot in nut aligns with hole in bedknife adjuster rod (L). Install new cotter pin.
Check torque required to rotate adjuster rod (L). Maximum torque should be 24 in. lb. (2 ft. lb.) (2.7 Nm).
After adjusting nut, check reel to bedknife adjustment.

Source: https://www.jacobsen.com/manuals/4258371_812_a.pdf